Sunday, November 15, 2020

Turn Class into a Social Gaming Experience with 99Math


This post may contain affiliate links. If you sign up, I may, at no cost to you, earn a commission.


During this time of social distancing and remote learning, a social gaming platform that connects students through academic content is a win all around. 99math is a social gaming platform for the whole class to bring students together and accelerate results. 

And best of all? 99math is totally FREE! Want to try it? Sign up here to get started.

99math generates the content, teachers just have to choose the topic they want to practice and no time is spent on preparation. Setting up the game and playing with students takes only 5 minutes from the lesson! Watch the video below to see 99math in action.


Here are 9 reasons to try 99math with your class:


1. It's FREE! 

99 math is free to you and your students. Use this link to sign up and get started playing with your class.

2.  Gameplay elements keep kids engaged.

Leaderboards, badges, and other game design elements are fine-tuned to get kids eager to advance.

3. Playing with friends turns math into a social gaming experience. 

Students can play with classmates, friends or other students across the world.

4.  No need to create the games. Just play!

99math has already generated the content, teachers just have to choose the topic they want to practice and no time is spent on preparation.

5. Designed for elementary and middle school students.

 The platform is designed for K-8th grade teachers based on their curriculum.

6. Great option for remote learning!

The nature of the online gaming platform makes it perfect for remote learning. 

7. EASY to set up.

Set up takes only 5 minutes.

8. Analyze results.

Powerful insights help teachers analyze students’ results and track progress to understand what needs focus.

9. Play at any level.

99math is designed for students at any skill level.

Let's play!

99math, the social gaming platform that makes students excited about math and gets them to progress fast - is launching in the U.S! Watch the launch video below to learn more. Ready to get started? Visit 99math.com sign up and start bringing the fun of a social gaming experience to your math lessons!


Sunday, September 27, 2020

Being BRCA1


"I wish I was calling with better news but your test did come back positive for the BRCA1 gene mutation."

That was the call from the genetic counselor that I'd been waiting for. I think I sighed and said "OK". It was March 26th of this year. The world had just shut down due to COVID-19. Now I'm not sure there is an ideal time to find out you have some crazy rare genetic mutation that skyrockets your risk for cancer but during a national pandemic certainly wasn't it. I blame 2020.

What is BRCA1?

Over a text message, my dad told me "You need to get tested for BRCA1". What? Like Angelina Jolie? That was about the extent of my BRCA knowledge at the time.

My dad had recently been diagnosed with prostate cancer and I knew my cousins, whom I had never met, had something going on to do with cancer but I really had absolutely no idea that there was a possibility it could affect me. I definitely didn't know what BRCA1 was and what it meant if I was positive.

Well, I can tell you that have learned quite a bit about it all since. After coming to terms with the fact that this mutation does NOT make me one of the X-Men (my 9-year-old son was super bummed about that) I started researching the facts. 

Here's what I've learned. Everyone has the BRCA1 and BRCA2 genes which suppress tumor growth. If you have the gene mutation (about 1 in 500 people do) they don't work correctly and basically open the gates for a cancer tumor growth party in your body. For me, my sister, and cousins, it means that by age 70 we have up to an 87% chance of getting breast cancer and up to a 63% chance of getting ovarian cancer. For the rest of the population, those numbers are 7.1% and .7%. You can learn more at BRCA Mutations: Cancer Risk and Genetic Testing.

Getting tested.

My sister and I 100% believe that our cousin saved our lives. 5 years ago, after being diagnosed with breast cancer and looking back into her family history my cousin's doctor recommended she get tested. She did and told her family members. When my dad was diagnosed with prostate cancer last December he mentioned my cousin's positive test and was tested also. Then my sister and I, after speaking to a genetic counselor, got tested as well. We are both positive.

Other than my cousin's diagnosis, we actually do NOT have a strong family history of breast cancer. Looking back into our history we know that my grandmother died at 42 from cervical cancer and my great-grandmother died from what they think was stomach cancer but now that we know about the BRCA1 mutation it's not a huge leap to assume that she might have had ovarian cancer that spread. Still, these aren't glaringly obvious signs that we should get tested. The family history that prompted my cousin to get tested was on her mom's side and she was surprised to find out that the gene was passed down from her dad, my dad's brother. 

If it weren't for the doctor who recommended this test to my cousin I might not have known until it was too late.

Should YOU get tested? 

No one can answer that question for you but there are some great resources that can help you make that decision. I can say that it's worth looking into even if you don't have a family history of cancer. Check out Understanding BRCA and HBOC > Should I get tested? from FORCE to learn more.

PSA: Ancestry tests like 23andMe do not count as genetic test for this mutation. You need to talk to a doctor.

The GREAT news

Although it's nothing I ever expected to deal with, especially at 38, I can say that knowing that I carry this gene mutation is truly a gift. It's like looking into the future and seeing the very real possibility of dying young from cancer and being able to stop it from happening. Because I know, I can take steps to drastically reduce my risk. 

For me, this means risk-reducing surgeries. I've had one so far and my others will most likely be in January and March (nothing is ever 100% certain during COVID). But am in control of these decisions. I don't have to just wait around to get cancer. I don't have to live with these statistics looming in the future, I can change them which is a pretty amazing gift.

Am I all sunshine and rainbows about it all of the time? No, of course not. Have I broken down in a complete and utter crying mess? Yep. But I have my friends and amazing family who support me and, through FORCE, a fantastic network of women and men who are all going through it too. I couldn't possibly list everyone who has gotten me through this crazy journey but you know who you are and I can't tell you how thankful I am for you.

Where can you get more information and support?

  • Teleties is a cool company that makes awesome hair ties and accessories. They have partnered with FORCE and make a donation with every purchase. 


Talking to others really helps. Since finding out I have received SO much support from my friends and family. My doctors, at Kaiser, have been amazing. Everyone on my heredity cancer team has been wonderful and I am so thankful to them. I have also connected with lots of people who have helped me so much along the way. Now I hope to pay it forward. If you want to reach out please do. You can email me at kdmoura@gmail.com or DM me on Twitter @KarlyMoura

Thanks for reading! Please share this post and resources with others to help spread awareness about hereditary cancer. 

Sunday, March 15, 2020

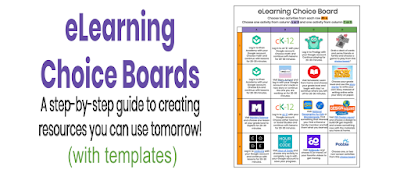
eLearning Choice Boards: A step-by-step guide to creating resources you can use tomorrow!


With the VERY sudden need for eLearning resources teachers and parents can become easily overwhelmed. As a technology teacher on special assignment and a parent of a second-grader (who is now at home for the next month), I can definitely relate.

I know we all want to create meaningful online lessons and activities for our students, however, just like in the classroom we need some ready to use materials to fill in the gaps as we create.

Choice boards are an excellent option for teachers during those first days of eLearning when we are getting our bearings or for parents who want extra options at home. There are lots of ways to use choice boards and tons that have already been created. Scroll to the bottom of the post to see more resources. 

For this post I am going to focus on the simplest way to create a choice board that will give your students opportunities to learn at home without spending a ton of time creating them.

If you are looking for ideas for creating digital lessons for your students check out HyperDocs + Google Forms: A guide to simple digital lesson design or visit my HyperDocs resources page for a template and links to already created lessons.

A step by step guide to creating eLearning choice boards


Step 1: Find apps that integrate with your LMS. 


We use Google Classroom (I know it's not technically an LMS but we use it like one) and there are lots of apps that allow me to import my classes directly. This means that my students can just log in with their Google accounts and I can see their progress. This is very helpful when you are trying to figure out how to check-in and see what your students are doing at home. You probably already have some online learning options available to you through your school too. Check them out and add them is as options.

If you use Google Classroom check out 70+ Awesome Apps that Integrate with Google Classroom from Kasey Bell

Step 2: Import your classes and set up your teacher dashboards 


Most of these apps allow you to decide where you want your students to begin learning or they may even give them a placement test. Once you have imported your students then you're set. Your students log in with their accounts and go.

Step 3: Find some games and non-screen options for your students to do at home 


There are tons of resources floating around like this fantastic menu of options from Pobble. Remember eLearning is just as new to most of our kids as it is to us. Both parents and kids need to be reminded that fun games and non-screen learning time are really important too!

Here is a list of edtech companies that are offering their apps for free for the rest of the school year due to COVID-19 school closures.


Step 4: Create your choice board


Here are is a Google folder of example choice boards that I created for grades K-5. They aren't fancy and they won't be winning any Pinterest Perfect awards (not really a thing but still, you know what I'm talking about). However, they serve their purpose and best of all they can be copied and modified to fit your class.


I also included a simple template with a table of resources curated by subject for you to use to create your own. Please go to "file" then "make a copy" on each document rather than requesting access.

Using choice boards at home.


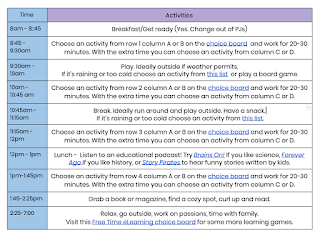
What would it look like for a student at home using these choice boards? A schedule is helpful to make these choice boards fit into our students' lives at home in a manageable way. 

Many sample schedules have been shared online but this one from Khan Academy caught my eye because of its simplicity and useability. I adapted their schedule and integrated the choice boards as learning options. Please feel free to use and adapt these schedules to fit your class' needs. Be sure to scroll down to find additional schedules and delete those that you don't need. Once again please go to "file" then "make a copy" for an editable version. 


A few thoughts...


I made these choice boards with the intention that they could be used as part of a "day of eLearning". Are the times I have listed perfect for any grade? Nope. Will it need to be modified as we go? Yep. However, I hope it provides you with something to share with your colleagues and students as a starting place. 

As you create your choice boards you can find apps and activities that work for you and your students. Or sign up and import your classes to the apps I have listed on this choice board and use it as is. Either way, make it work for you.

Just remember to give your students and yourself a BIG break when moving to eLearning. This is new to all of us. Some students, families, and teachers have access to loads of tools and resources and some are just trying to figure out how to make it from day to day. Let's all give ourselves permission to figure things out as we go =)

More choice boards and resources.


There are TONS of resources out there for creating choice boards. Here are just a few I have found and I will continue to add more as I find them. 


If you create a choice board or two of your own please share them with the hashtag #tsgivets and tag me on Twitter @KarlyMoura. I would love to see what you create!


Wednesday, June 12, 2019

Top 10 ISTE tips (plus resources from the pros)


ISTE 2019 is FAST approaching and since this is my very first ISTE experience it made sense to turn to the pros (my Twitter PLN) for advice. I posted the tweet below hoping to see what conference veterans and 1st timers like me had to say.

As always the amazing Twitter community came out in full force with incredible tips, tricks, tools, advice, and resources. Be sure to take a look at the entire thread and follow these generous educators who took the time to share their tips and resources. 

Below you will find 10 terrific ISTE tips from other educators along with 5 incredible resources shared across the Twittersphere. 

These tips have been a huge help to me as I plan for the conference and hopefully they will help you too! 


10 Terrific ISTE Tips

*Note these are just some of the amazing responses from educators sharing their ISTE expertise with us. Be sure to check out the entire thread along with the #ISTE19 hashtag to connect with more!

1. Wear comfortable shoes. ISTE is HUGE and you will be walking a lot! Be sure your footwear is up to the challenge.


2. Make a plan. Download the app (Apple Store/Google Play) to plan your conference experience. Check out the tips from Nadine and Steve in the resources below for the best ways to filter and search. 


3. Make a back-up plan. Your first choice (or your second choice) sessions might be filled up. Have a plan B and C and D.


4. Be flexible. Your back-up, back-up plan might not work out and that's OK! Some of the most exciting takeaways attendees have shared come from the impromptu meetings they had in the hallways!


5. Connect with your PLN. This is what I am most excited about! Matt Miller describes it as feeling like his "whole Twitter feed is in this hallway". Take the time to seek people out and meet up in real life!


6. Bring an extra charger. This is just good advice. Pack one or two extra chargers for your phone, you're gonna need it!


7. Allow time between sessions. Sometimes we forget that we can't teleport ourselves from place to place. Be sure to schedule yourself some walk and wait time. Or even some recharge and refuel time!


8. Bring snacks and water. This is one I might have not even thought about. Snacks are a must and all of that walking and talking and learning will need some fuel! You don't want to have to wait in any MORE lines than necessary.


9. Check out the meet-ups. There are some VERY cool meet-ups and social events happening at ISTE19. Be sure to check them out and get your tickets if you need them!


10. Visit the city. No, the ISTE conference ISN'T the only thing in Philly (although it will probably seem like it!). Be sure to take advantage of the sites while you're there.


5 Fantastic Resources from the Pros

Nadine Gilkison, an ISTE veteran and presenter, put together this Google Doc goldmine of ISTE tips for 1st timers and those returning. She has some great tips on planning ahead and selecting sessions. Also, take note of her session "Picture This! Kids applying Digital Citizenship in the Real World"


This post, written by Steve Wick, is chock-full of incredible resources plus links to presenter suggestions with links to their session information. Steve is also facilitating some sessions at ISTE so be sure to stop by and see him.

Lisa Whiston shares some excellent tips in this post. She includes tips on what to pack, a bit about the dress code and ideas for documenting and sharing your learning. The post is from #ISTE15 but the tips still apply.

Check out this great tip and resource from Susie (@engagethemiddle) about the BYOD sessions. She shares a GIF that shows how to find and register for them.


Looking for even MORE resources? Check out Laura Cahill's Prepping for #ISTE19 Wakelet collection. I am SURE she will add more as the conference nears.

Good luck with your ISTE planning and hopefully I will see you there!


Thursday, October 18, 2018

The 5th C: Teaching the art of curation with Wakelet


The latest tool causing a buzz in the world of educational technology is Wakelet. Check it out because I'm sure once you do you will be hooked on this simple curation too.

I first heard about Wakelet back in April when Randall Sampson guest moderated a #TOSAChat. The chat topic was "Curating the Experience" and he spoke about Wakelet and used it to curate our chat and share it back with the community. At that point, I filed Wakelet away as a really cool tool to check out soon. 

Fast-forward to July when I heard Jennifer Gonzalez speak about the importance of teaching students to curate in the CUE Craft Ditch That Textbook Summit. She stated that "The art of curation isn’t just about saying “here”. It’s about saying “here is what this is and here is why it is relevant and interesting.”

Thinking about the importance of teaching our students to curate reignited my interest in Wakelet.

Getting started with Wakelet


Wakelet is a free platform that allows you to organize and curate content to save and share. You can save videos, articles, images, Tweets, links or even add your own text. 

My first experience using Wakelet was for curating a chat on Twitter but I quickly realized it can be used for so much more in the classroom. It can be used for bookmarking, digital storytelling, newsletters, gathering resources, portfolios and so much more.

But as always the best way to learn about a tool is to explore and use it yourself! 

Paul West (another Wakelet expert) and I created a HyperDoc to share some ideas on the power of curation and to walk you through getting started using Wakelet for curation in your classroom. 

Please feel free to use this resource to share Wakelet with your colleagues or even to teach older students the power of curation. Just go to "file" then "make a copy" for an editable version added to your Google Drive.


Using Wakelet in the classroom


Paul recently wrote a guest post on the Ditch That Textbook blog where he shared 12 curation ideas for teachers and students with Wakelet.
He includes ideas like using Wakelet with:
🌏 Google Expeditions
💡 HyperDocs
📰 Parent Newsletters
📚 Novel studies
In addition to these ideas, he shares loads of fantastic resources for teaching the power of curation. 

There are so many ways to use Wakelet with your students and colleagues. Join the Wakelet community on Twitter by following @Wakelet or search the hashtag #TheHumansAreComing. Also be sure to check out their YouTube channel for great tutorial videos.

It's fun and easy to curate and share your collections with others. You check out my collections at wakelet.com/@KarlyMoura

Wakelet is always working on bringing great updates to you and your students. If you are interested in being part of a group that tests new features contact callum@wakelet.com

Disclaimer: I don't have any relationship (financial or in exchange for services) with Wakelet. I just enjoy using it, have found it to be very helpful and wanted to share it with you!

Monday, April 30, 2018

Ignite a Flipgrid Fire 🔥 15 MORE Ways to Use Flipgrid in Your Class

A year ago I wrote a post called Catch the Flipgrid Fever! 15 Ways to Use Flipgrid in Your Class and it quickly became my most popular blog post. Matt Miller was even kind enough to share it on his blog as a guest post. Since then I have had some wonderful experiences sharing my love of Flipgrid with others and have seen so many incredible ways to use this tool with students. You can check out all of my Flipgrid resources at the end of this post 👍 

If you're not familiar with Flipgrid it is a video response platform where users can respond to a prompt and have online video discussions. Teachers can provide feedback to students and students can also provide feedback to one another. With Flipgrid One (Free) you get one Grid with unlimited topics. So if you have multiple classes or subject areas you can just create a different topic for each and share that topic code. With Flipgrid Classroom ($65 per year) you get unlimited grids, topics, responses, and replies to responses. 


To learn more about Flipgrid and all of the bells and whistles available to you check out the free eBook Sean Fahey and I wrote: The Educator's Guide to Flipgrid.

So how can you use the Flipgrid with your students? Here are 15 MORE ideas for using this video platform in your classroom. 


1. Virtual v
ocabulary word wall When working on a unit have your students record a video describing the meaning of important vocabulary words. They can hold up a card in their selfie video with the word written on it so the words are easily accessed by other students. 


2. Activate prior knowledge on a topic My good friend, and awesome high school math teacher, Mark Tobin recommended simply asking the students to activate their knowledge on a topic before teaching it. He said he had tremendous success by just using that strategy. Why not take it a step further and have your students record a Flipgrid video sharing their background knowledge on a topic before you begin? Students could then reply to their original video after the unit sharing everything they learned.

3. Three Act Math  A brilliant mathematical teaching strategy developed by Dan Meyer is Three Act Math. Three Act Math is a series of tasks consisting of three distinct parts taking the learner through deep mathematical thinking. This strategy gives learners lots of opportunities to reflect on their mathematical understanding. Have your students record a Flipgrid video after each act replying to the previous video to share their reflections as they go through the acts to document their learning. Looking for more ideas for using Flipgrid in math? Check out 10 Ways to Enhance Math Lessons With Flipgrid by Sean Fahey.

4. Celebrate Global Read Aloud all year long The Global Read Aloud is a set 6 week period that spans from early October through mid-November and teachers all over the globe read one book and connect with other classrooms all over the world. With a tool like Flipgrid, you can connect with educators all over the world anytime and share as you read a novel together. Want to take it a step further? Find a book with a companion novel HyperDoc to complete at the same time. Many of these HyperDocs such as The Wild Robot and Pax were GRA books from past years. Choose a book, a companion novel HyperDoc, get connected and get reading!

6. Speaking skills assessment With Flipgrid you can provide written feedback to students and give them a rubric score for performance and ideas
With Flipgrid classroom, you can even customize the rubric (how-to screencast). Speaking well is an important and often undertaught skill. However, there are amazing FREE resources out there to help you and your students. Sean Fahey and I shared the benefits of using the PVLEGS framework created by Erik Palmer with Flipgrid in our Unplugged Webinar. The PVLEGS framework includes a great rubric to use when assessing students speaking skills in Flipgrid. A great tip from Matt Miller in his recent Classroom Live 2.0 webinar was to pick just ONE of the PVLEGS expectations to focus on at a time. It's too much for students to focus on them all at once.


7. Computer science shareout After creating a project in a coding program such as Scratch students can explain their project, ideas for improving, what issues they came across and how they debugged their program. Students can add a link to their project when they respond to the grid so the teacher or another student can view their program while listening as the student explains.

8. Debugging a program or ??? When we refer to debugging we are usually talking about finding and fixing errors in a computer program. However, my six-year-old son found and fixed his errors when reading and happily exclaimed that he had just debugged. After completing a math task, reading a passage, working through the engineering design process or when creating a computer program students can use Flipgrid to reflect on the process identifying their errors and sharing how they fixed them. Want an example of how this would work? I created this topic in the Discovery Library to get you and your students started using Flipgrid to debug in computer science.

9. Map of historical landmarks In California, our fourth-grade curriculum is famous for the Mission reports the kids are expected to do each year. Of course, students also do state reports and various other projects for social studies. What if instead of, or in addition to a fun alternative to a report, students also share what they know in a Flipgrid video and a QR code link to the video is stuck on the map? Geography, history and oral reports all rolled into one.

10. Flipgrid film festival Short films can be incredible teaching tools and are just plain fun to watch. Pixar has even paired up with Khan Academy to create Pixar in a Box which is a behind the scenes look at how Pixar artists do their jobs. Challenge your students to create their own short films and use Flipgrid as the platform for sharing their stories. Have students reply to their short film introducing themselves and sharing their thought process while filmmaking. Pleasanton Unified School District hosts a yearly film festival and provides some great resources including HyperDocs to help get you started.

11. Record an ongoing story When I mentioned that I was going to write an update to my 15 Ways to Use Flipgrid post my friends Claudio Zavala Jr. and Scott Titmas of course shared some amazing ideas. Claudio suggested having students record an ongoing story through Flipgrid. Have one student think of a title then the next record a 30-second beginning the next builds on that and so on and so forth. What a fun way to get the whole class involved in and create a unique story to share!


12. Encouragement from home Scott suggested having families record videos for their children to provide encouragement from home. Don't just wait for testing time to have your families record videos. The beginning of the year, at parent conferences, a send-off to the next grade are all ways to get families involved in encouraging and supporting their kids.

13. Flipgrid in Physical Education Using proper form when exercising is important. Students can record a video of the proper way to do a jumping jack, lunge, stretch, lift weights or kick a ball. As a soccer coach having a short video to remind me and my team how to perform the proper moves is a valuable resource.

14. A virtual library of tech tips and tricks How many times have you had something go wrong with the Chromebook or iPad and you KNOW you have fixed it before but you just can't remember how you did it? Have your school tech squad or group of tech-savvy students create videos with tech tips and tricks on a Flipgrid topic to share with the rest of the school. You can have a topic for Chromebook troubleshooting, a topic for iPad tips and even a whole topic for getting started with commonly used apps and programs.  

15. GridPals! An incredible idea from Bonnie McClelland, GridPals connects classrooms across the globe creating virtual pen pals. You can take advantage of GridPals using Flipgrid One. However, if one of the GridPals teachers has Flipgrid classroom then you can become CoPilots on the same grid giving both teachers access to the educator dashboard.

So there you have it. 15 more ways to use Flipgrid in your class. However, the possibilities are truly endless for innovative educators. 

Looking for even MORE Flipgrid resources? Check out the links below to blog posts, webinars, ebooks and more that I have created or co-created with other awesome Flipgrid ambassadors. Have fun and happy Flipgridding!


Blog Posts:

Flipgrid and HyperDocs: Amplifying student voice in purposeful digital lesson design.

Meet the All NEW Flipgrid! 10+ Must-Try Ideas for Using These Updates With Your Class

Take Off with Flipgrid's Newest Feature: CoPilots!


HyperDoc:
The 411 on Flipgrid HyperDoc

FREE Ebook:
The Educator's Guide to Flipgrid (2nd Edition)

Webinars:
Flipgrid Unplugged 4: Sean Fahey and I go beyond just using Flipgrid as the new cool tool in edtech.
We answer the question, "What Now?" and share instruction-based ways you can use Flipgrid to amp up engagement in your classroom in this webinar and provide LOTS of resources on our website.


Flipgrid Unplugged #4: What Now with Sean Fahey and Karly Moura from Flipgrid on Vimeo.

"Flipping out with Flipgrid" on Live Classroom 2.0
Both teachers and students are flipping out over using Flipgrid. But why? ***Hint, hint...Cause it's AWESOME!***
Learn more about what Flipgrid is, how to use it, and ways to you can implement this incredibly versatile and awesome tool in your classroom to help give students voice and choice in their learning.