Showing posts with label Tips. Show all posts

Friday, June 30, 2017

Flipgrid and HyperDocs: Amplifying student voice in purposeful digital lesson design.

This is a collaborative post written with the incredible Sean Fahey, an amazing 6th grade teacher in Indiana. Be sure to follow him on Twitter and check out his blog at faheystech.blogspot.com.  


If you follow either one of us on Twitter, you will quickly find out that we have many things in common. Two of those being our passion for Flipgrid and HyperDocs. We are have created many HyperDocs collaboratively and share them with our PLN on Twitter. We are also both Flipgrid Ambassadors and love sharing this amazing tool with other educators. We believe that powerful digital lesson design infused with the power of amplifying student voice is truly a game changer in the classroom.
Screen Shot 2017-06-27 at 9.36.46 PM.png

Whoa. Stop the music. You don’t know about Flipgrid or HyperDocs? Well, then you have our permission to stop reading and explore any and all of the resources below.


OK now that we are all on the same page with the WHAT, let’s talk about WHY HyperDocs and WHY Flipgrid? And HOW we can use them together to amplify student voice in purposeful digital lesson design?In an episode of the Cult of Pedagogy podcast, Jennifer Gonzalez interviewed Lisa Highfill, Kelly Hilton, and Sarah Landis the creators of HyperDocs.


HIGHFILL: ...You know when a new web tool comes along, you’re all excited? Like everyone’s excited right now about Flipgrid and whatnot.
GONZALEZ: Yeah.
HIGHFILL: But then I want to ask them, what are you going to do with it? How are you going to build the pedagogy around that cool tool?
GONZALEZ: Right.
HIGHFILL: And where in the lesson flow would it fit in your HyperDocs? So it’s really saying, “I love flashy new tools. Now let’s think about how you can effectively use them in the classroom, and then link it into your HyperDoc that way."
Lisa makes a great point. How many times have you got caught up in all the hoopla over a new edtech tool or update? Flipgrid is THE hot new edtech tool educators are excited to use. However, as Lisa asks, “What are you going to do with it? How are you going to build the pedagogy around that cool tool?”

We need to make sure that we slow down and think about why are we including the technology we have chosen for our lessons. We shouldn’t just toss in a Flipgrid or any other edtech tool we might like just because we need or want to use technology.  Karly’s friend Nick Zefeldt, advises that when implementing educational technology we need to make sure and ask “Is it meaningful and is it manageable?”

EXHIBITION.png

Well, we say “Yes!” to Flipgrid being both when used correctly and we want to give some ideas how you can effectively use Flipgrid in the classroom, and then link it into your HyperDoc lessons. The reason being that great HyperDocs are created and taught with purposeful lesson design and pedagogy and Flipgrid being so versatile by allowing for video feedback and increased student voice within your digital lesson design.

While HyperDocs can take many forms (slides, maps, drawing, forms etc), we will be referring to the sections from the basic HyperDoc template for our examples. The basic HyperDoc template has seven parts that students go through as you complete the lesson. This template was created by Sarah Landis to help others get started and gives an excellent description of each part.

There are tons of ways you can incorporate Flipgrid into your HyperDocs, here are just a few ideas for getting started. Note: You can go to “file” then “make a copy” of any of these templates or examples to use with your own class.
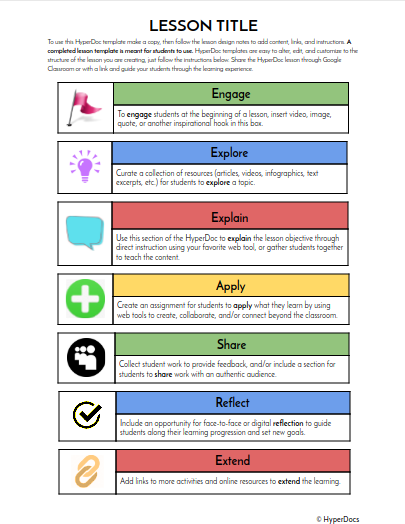
ihB1RiEngage
Use Flipgrid to engage students at the beginning of a lesson by including a video, image, quote, or another inspirational hook in your topic for students to respond to.

  • Idea 💡  KWL chart gets a video REMIX. Have student respond to a topic sharing what they know. Then have them reply to themselves and classmates sharing what they want to know. After the lesson or unit have students come back to their own video and respond to themselves with what they have learned. Woo! A FlipGrid KWL


Explore

Students explore a topic through a collection of resources (articles, videos, infographics, text excerpts, etc.) in the HyperDoc.

  • Idea 💡 Bring in experts and take your students beyond the four walls of your classroom! Flipgrid hosts an amazing opportunity with their Flipgrid Explorer Series. They have done two so far and more are planned! Use the expert videos in the Explorer series for your students to learn about new and exciting animals, places and careers. HyperDocs are a perfect accompaniment to this series as you create your digital lessons around these topics and extend the learning in your own classroom.
  • Idea 💡 So Flipgrid’s explore series doesn’t fit into your curriculum? Then create your own! Teachers can do this by creating a ‘virtual field trip’. Go to a place (we’re thinking state parks, historical sites, museums, etc)  that is of value to your lessons and record short videos of the sites to bring the content to your classroom.  Add the videos to a Flipgrid for your students to explore and respond to. Even better collaborate with other teachers across your district, state or even in other countries to create an explorer series for many different classes to connect through.


Apply and Share:

Create an assignment for students to apply what they learn by using web tools to create, collaborate, and/or connect beyond the classroom.  Then collect student work to provide feedback, and/or include a section for students to share work with an authentic audience.

  • Idea 💡 Have students use storytelling web tools to apply their learning. Then appsmash with Flipgrid and get them to share with the class and beyond! Students show what they know using video or digital storytelling in a different app then upload to Flipgrid to share.
  • Idea 💡 You don’t need to appsmash. Students can simply connect with other students across the school, state, country or world! Before, during and/or after a unit have students connect with each other to share what they learned.

Reflect:
Give students an opportunity for digital reflection on their learning journey using Flipgrid to guide students through their learning progression and set new goals.
  • Idea 💡 Have students reflect back on the lesson or unit and share what they have learned. This is a powerful way for students to be thoughtful about their learning process.

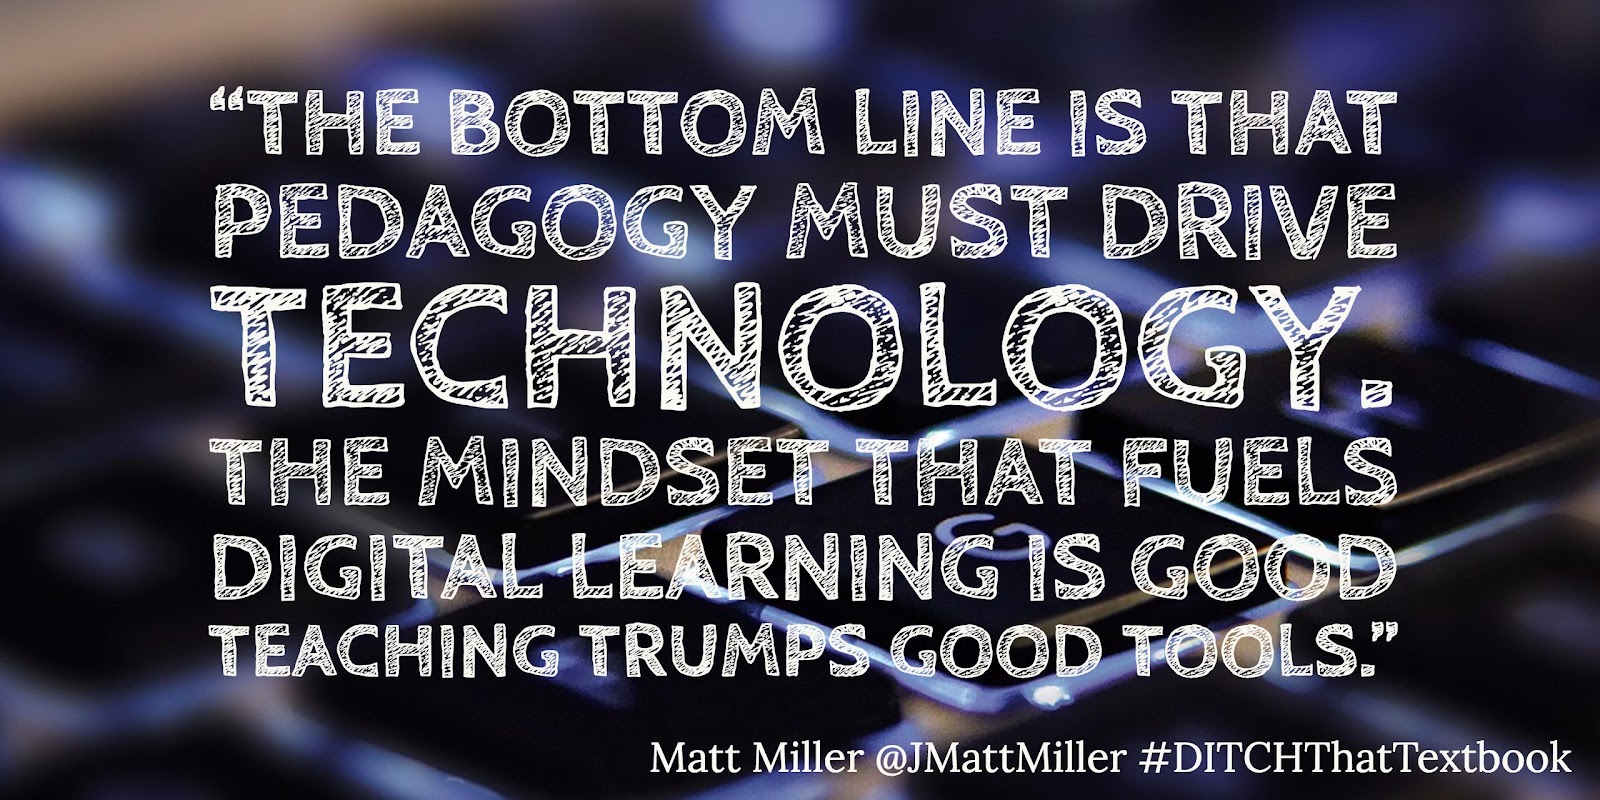
This quote from Matt Miller reminds us that we must be intentional in our teaching and integration of technology no matter what tools we decide to use in our lessons. “The bottom line is that pedagogy must drive technology. The mindset that fuels digital learning is good teaching trumps good tools.”

Adobe Spark.jpg

Friday, April 15, 2016

Hack Your HyperDoc with Google Drawings! Three Simple Ways to Get Started.

HyperDocs, created by Lisa HighfillKelly Hilton and Sarah Landisare a serious gamechanger when moving beyond just providing devices to truly integrating educational technology. (You can read ALL about HyperDocs and how to get started creating them here!) Google drawings, which I lovingly refer to as the "unsung hero" of Google Apps, is an incredibly versatile tool for getting students creating and showing what they know in a fun, visually stimulating format. Here are three simple ways to get started!


1. Embed a Google Drawing as a template in a HyperDoc for students to edit.

One of my favorite ways to use Google Drawings is to embed a Drawing in a HyperDoc that students can edit by double clicking. This allows you to have something such as a graphic organizer, virtual math manipulatives or even a sort in the doc for students to complete. When the HyperDoc is copied or assigned in Google Classroom the drawing is also copied so that each student gets their own copy of your template automatically embedded in the doc.

To insert a Google Drawing into a HyperDoc or other Google doc (how to GIF below)
  • Place your cursor where you would like the drawing to be embedded.
  • Click on "insert" then "Drawing".
  • Create your template by inserting images and/or text boxes.
  • Click "Save and Close".


To edit the drawing your students will double click, make their changes, then click "Save & Close". When they turn in the document their saved drawing will be embedded. A great way for students to show what they know!

Examples of ways to use Google Drawings templates in HyperDocs.
  • Have students sort words by moving them into the column they belong. In this Food Chain HyperDoc students are categorizing organisms as either "producers, consumers, or decomposers". Google Drawings can be a great way for students to sort words for your word work time. Another great way to incorporate word word is to have them create "magnetic" poetry. Check out Kasey Bell's Collaborative Magnetic Poetry with Google Drawings (refrigerator image included =). She has a link to a template ready for you to use in your next poetry unit! 


  • Have students read a text, watch a video or view an image in a HyperDoc then use a graphic organizer or note taking template for brainstorming, drafting, taking notes, or responding. Lots of graphic organizers and templates are already shared and ready for you to copy make your own. Eric Curts has 40+ Graphic Organizers in this Templates folder! Once in the folder be sure to click "Add to Drive" (how to GIF) so that you can make a copy of all the templates. Matt Miller shares 15 FREE Google Drawings graphic organizers in this Ditch That Textbook past.  Barbra Drasby @MsDrasby has an awesome Story Creator graphic organizer that includes links to Help Hotline for students when they get stuck.

2. Students insert a Google drawing into a HyperDoc to demonstrate learning.

Students can use easily insert a Google Drawing into their HyperDoc to show what they have know or to create an image or infographic. In this HyperDoc template students will demonstrate new learning visually with a Google Drawing.  
Examples of a ways students can use a Google Drawing to show what they know.
  • Have your student create word art. In this One Word HyperDoc students create word art in Google Drawings to share their One Word that describes their goals, dreams, ambitions and who they want to be in the new year. This could be used at the beginning of a new calendar year or at the beginning of a new school year.
  • Using a diagram, cross-section, map or other visual students can recreate and label their own image. After learning about the Solar System in this Space Explorer HyperDoc third grade students draw and label the planets using an illustration as their guide. 

  • After a science demonstration or experiment students can draw and label their finished project. They can also use drawings to plan out their model or project. Even first graders can use the tools in Google drawings to draw lines and boxes to represent a circuit. After visiting our STEM lab students can share their learning in a STEM Lab Reflection HyperDoc.
Early second grader's model of littleBits circuit.

Fifth grader's model of cubelets robot.


3. Get "GAFE SMASHING" with those HyperDocs! Docs + Slides + Drawings = Great Googley Goodness.

A fantastic way to get students connecting and collaborating in a HyperDoc is to have students insert a Google Drawing into a collaborative Google Slides presentation to share out what they have learned with the rest of the class or beyond! 


Getting a Google Drawing into a Google Slides presentation is a little more involved but it is worth it, especially if you are using it as way for students to share out  what they have learned with the whole class. When students insert a png or jpeg of their drawing other students can make comments but can't edit the original image in the collaborative slides presentation.

You will want to assign or have a forced copy (change "edit" at the end of the drawings url to "copy" then copy and paste the entire url) of this template which is formatted to fit a Google Slide. Then students can create a Google Drawing and have an image that is perfectly formatted for slides! Here is an easily adaptable template for you to use in your HyperDoc. Collaborative Google Slides with Google Drawings TEMPLATE. Don't forget to change the share settings to "anyone with link can edit" before assigning to the students.

Some ways to get your students connecting and collaborating with this fabulous "GAFE Smash"!
  • Students create a graphic design or ad to demonstrate their knowledge and apply it. In this Simple Machines Unit HyperDoc students are challenged to design a product using one or more simple machine(s) that would help someone with disabilities. Then they will create an ad for their product using Google Drawings and share the image in a collaborative slides presentation.
  • After viewing media or reading text about a topic students can create an infographic or poster in Google Drawings to share with the class in a collaborative Google Slides presentation. Students can comment on each others' drawings, ask questions or give feedback. In his post Google Drawings interactive posters (no glue sticks necessary!) Matt Miller shares some great tips for getting students creating some fantastic posters in Google Drawing! 
(Note: if you download a drawing as a png, jpeg or take a screenshot the links in a drawing no longer work. If you want to have students create a poster/image and keep the links they can do the same thing using the drawings features in Google Slides. Thanks Sean Fahey for that tip!)


More Google Drawings Resources


Looking for a quick way to bookmark all of the Google Drawings resources shared above plus more? Check out this padlet full of Googley goodies! Have fun and don't forget to share your creations with @TsgiveTs!


Sunday, April 10, 2016

Exploring the Google Cultural Institute: Simple Ways to Bring Virtual Field Trips, Beautiful Art, Historic Images & More To Your Students.

The Google Cultural Institute is full of incredible images including beautiful images of famous artwork and artist. I stumbled upon this resource this morning and was blown away by the endless possibilities of using this in the classroom. There are three Featured Projects; Historic Moments, World Wonders, and Art Projects. I know that I have barely scratched the surface of what this site has to offer but here is a quick overview of each.

Historic Moments


What really took my breath away was exploring the Historic Moments Collections. Here you can "Explore online exhibitions detailing the stories behind significant moments in human history. Each exhibition tells a story using documents, photos, videos and in some cases personal accounts of events." "Historic Moments - Google Cultural Institute." Historic Moments - Google Cultural Institute. N.p., n.d. Web. 10 Apr. 2016.


Powerful images bring history to life, making us FEEL and allow us to be transported back in time as we explore history in a way that goes way beyond just reading about it in a textbook. 

In the short period of time I was exploring I found some amazing resources that will get your students hooked on history.

World Wonders


Angkor Wat, Street View. Digital image. N.p., n.d. Web. <https://i.ytimg.com/vi/nWyKgZc78Mo/maxresdefault.jpg>.
In World Wonders you and your students can explore the world the way it is today and in ancient times. Historic images, an embedded map of the location and Google Street view transports your students to historic sites around the globe! So many more to choose from but here is a look at a few that caught my eye.
  • Take your students to Egypt with a virtual field trip to the Pyramids of Giza!
  • Transport your students way back in time as they discover the wonder of Stonehenge, Avebury.
  • Explore the beauty and be awed by the incredible Grand Canyon! Four street views and over 1,000 images make this a fantastic virtual field trip.

Art Project


Diving into Art History? Check out the immense Art Project section. You can search by artist, medium and more! The compare feature allows you to see two images side by side for a comparison. This would be a very useful tool if you are studying specific artist, medium, time period or other attribute. To compare click the compare icon in the lower left hand corner.
Then click on the image you want to compare and finally click on the compare icon in the upper left hand corner next to the + sign to add it. 


Repeat with the next image you want to compare.

Share to Google Classroom!


The best part is that that you can share directly to Google Classroom! Just click the Google Classroom icon and choose the class you want to share them with.


Go Mobile


Want to take the Google Cultural Institute with you on the go? Check out the Arts and Culture App available for Android and IOS

There are so many possibilities for using this amazing resource in the classroom. I would love to hear how others are using it to bring history to life with your students.

Thursday, April 7, 2016

HyperDocs! Need I say more????

This post was updated on 6/11/16 to include links to new videos and resources.

I love HyperDocs. Love, love, love them. I love making them, I love co-creating them with other teachers, and most of all, I LOVE watching and connecting the kids while they work on them. If you aren't familiar with this awesome digital tool keep reading for the 411 on HyperDocs!

Where did HyperDocs come from?


The terrific trio Lisa Highfill, Kelly Hilton and Sarah Landis coined the term HyperDocs when they created this amazing digital tool. They also created @Tsgivets a Twitter account dedicated to helping teachers share their creations with one another for FREE! How awesome is that?


A hyperwhat?


I first learned about HyperDocs from my colleague Nick Zefeldt when he came to give me some tech TOSA tips. He showed me an example hyperdoc and went through the lesson with me. BAM that was it, match made in edtech heaven! I was hooked on HyperDocs!

Isn't a hyperdoc just a doc with hyperlinks???


NOPE! It is SO much more! The beauty of HyperDocs is that the creation of the doc itself requires the teacher to take into consideration the needs of the students, how they will engage in the content, what ways they can reflect on their own learning, and how they can show what they know. It is also ALL about packaging. HyperDocs LOOK engaging because they are. Kids enjoy doing them and while they are learning, collaborating, creating and reflecting in their doc the teacher is given the gift of time to connect with students and engage in quality conversations with them about their learning.


Click here to see a larger version of this image.

OK I'm interested, how do I learn more?


At the CUE 2015 National conference held on March 17-19th 2016, Lisa held a session called Extreme Pedagogy Makeover using HyperDocs. This session gave us an overview of what HyperDocs are and how to get started. Check out the HyperDocs Explained page on Lisa's website and watch the entire session below!


NEW WEBSITE ALERT!!!


The official Teachers Give Teachers website is here! An INCREDIBLE site filled with amazing resources. You can Take 1 by searching through the ever growing library of shared HyperDocs created by teachers everywhere. OR you can Give 1 by registering on the site (easy peasy to do, you can register with Google) and upload your OWN HyperDoc (see LOTS of resources on how to create your own below) to share with the world! Go to TeachersGiveTeachers.net and check it out, it's pretty dang awesome.


I'm hooked! How do I get started creating?


Three ways to get started with HyperDocs.


1.  Use a template to guide you.
My favorite way to begin using HyperDocs is with a template. Lisa, Sarah and Kelly have created some FABULOUS templates you can copy and use. They are a great way to get started making HyperDocs. As I began to do some trainings with my staff and district I started creating some HyperDoc templates that included links to resources and ideas for each section. I spoke about the power of templates and Google tools when I was a guest on their weekly show "HyperDoc Hangouts on Air". See the episode below and get links to all of the templates and resources I shared by clicking "show more" under the YouTube video.


2. Remix someone else's already awesome HyperDoc!
The great thing about Twitter and TeachersGiveTeachers.net is that LOTS of teachers are sharing their amazing HyperDocs for FREE online. I post mine all the time! Here is a link to my shared HyperDocs folder that I will continue to add to (most have also been added to the website). The best part is that the teachers posting their work encourage you to take their HyperDoc and tweak it to turn it into one that works for you and your students (just be sure to put "inspired by" and the original creator's name at the bottom)! THAT is the power of TeachersGiveTeachers.netIn addition to the terrific trio there are some incredible HyperDoc creators sharing their resources online. Follow these people on Twitter, check out their blogs or websites and snag their HyperDoc gems!


Rocky Logue @slogue89
7th Grade Teacher, Templeton, CA
mrloguesroom.com


Heather Marshall @MsMarshallCMS
Middle School Teacher, Crockett, CA
middleschoolmind.com
Sean Fahey @SeanJFahey
4th Grade Teacher, Paoli, IN
faheystech.blogspot.com
Kendra Tyler @ktylercuesd
Junior High School Teacher, Corning, CA

Matt McFarlane @MrMacsclasses
Middle School Teacher, Templeton, CA
mrmacsroom.weebly.com

Lisa Guardino @LisaGuardino
Educational Technology TOSA
scribblesfromaschoolteacher.com

In addition to the website also check out this padlet FILLED with awesome HyperDocs shared by tons of amazing teachers. When you create one upload it to TeachersGiveTeachers.net and add it to the padlet too!


3. Start from a blank slate.
Open up a new Google Doc or Google Slides presentation and get creating! Lisa, Sarah and Kelly have got you covered with their How-To HyperDoc website! This site gives you step-by-step directions for creating your own hyperdoc. Also check out Lisa's "HyperDocs Explained" webpage for more ideas and links. Scroll down to Getting Started and check out the "Tips for Creating your own HyperDoc" link!


But WAIT There's MORE!

The HyperDoc Handbook is FINALLY Here!


Lisa, Sarah and Kelly have written a book! The HyperDoc Handbook has finally been released and it is already the #1 Best Seller in Computers and Technology! 

Order your copy on Amazon today and jump on the HyperDoc train! Don't forget to write a review if you love it and spread the love on Twitter with #HyperDocs and @TsGiveTs.

Sunday, January 17, 2016

Gamifying Our STEM Lab. Leveling Up With Challenges, Digital Badges, Display Pages & More!

*Update: Since this post I have added more challenges and badges to include Sphero, MakeyMakey, Scratch and more. There are now over 60 challenges and badges for your students! Please share any challenges and badges you make. I would love to add them. Check back again, I am adding more challenges and badges all the time. Check out the crowdsourced Gamification padlet at the end of this post too!


Our STEM Lab/Makerspace is a HUGE hit with our students. Since I oversee the lab and take the classes in I get bombarded by kids all day asking if it is their day to go to the STEM Lab. They are building, discovering, exploring, designing, problem solving, and having a blast doing it. However, as the kids continued to explore the STEM Lab we began to notice that they had moved past the exploration phase and wanted a bit more direction and challenge. We realized that we needed to up our game a bit to take our lab to the next level so we decided to gamify our STEM Lab with challenges and badges! It took some prep but once the challenge cards and badges were created we were ready to roll. We are happy to share our tips, tricks and resources so that you can gamify your STEM or STEAM Lab too.


How You Can Gamify Your STEM/STEAM Lab

1. Make challenge cards. 
I looked online for ready-made challenges and used the instruction booklets that came with our kits to create challenge cards for our students. As we add to our STEM lab and work toward making our lab a true STEAM lab we will continue to add challenge cards and create badges to match. You can view our challenge cards and challenge card template here. Feel free to make a copy to use and/or start creating your own. 


2. Create your own or find ready-made digital badges.
I used Google Draw to create our badges. After following this tutorial Creating a Badge with Google Draw by Alice Keeler it was easy to create our own template and make our own badges. You can upload all of our STEM Lab badges for ideas and inspiration or use them in your own lab.
littleBits Art Bot Badge

Looking to find more badge resources? Cate Tolnai is who inspired me to explore badges, she shares lots of resources on Twitter and on her blog. Also check out 5 Awesome Resources for Badges in the Classroom by Kasey Bell

3. Identify a way to keep track of earnings.
In our lab we go pretty low tech with a simple STEM Lab Student Check Off Sheet. Each student has their own check off sheet which is kept in a file under their teacher's name. While in the lab the students let us know when they have earned a badge and they get it initialed by me or their teacher. 

If you want to go totally digital check out Creating Badges with Google Sheets by Alice Keeler. This awesome post shows you how to create (in draw), then organize and assign digital badges with Google Sheets.

4. Display those shiny new badges!
Now that our students have started earning their badges they need a place to display them. The fourth and fifth graders are creating a Google Site as their digital portfolio so one page is dedicated to displaying their badges. The 2nd and 3rd graders will use this My Badges Google Doc assigned through Google Classroom to display their badges. 


Example of "My Badges" page on a Google Site

What our Gamification & Badge System is NOT


So far our badge system has worked out really well in our STEM Lab. Our kids are excited about the badges and look forward to displaying them on their Google site or badge page. We are still working out the kinks and will continue to create challenges and badges as we grow our STEM Lab. However, it is important to note what our challenges and badges are NOT.

  • It is NOT a competition. There is no public display of which badges are earned by whom. The Google Sites and Docs can be shared of course but only if the students share them. Students who work together on projects all earn the badge. We go over this together and teamwork is encouraged.
  • It is NOT a requirement. Students do not have to earn badges. It is completely optional for students to work towards badges. I will be creating "inventor" badges soon for students who just want to create something new but also would like a badge (check the badges folder and challenge cards for updates).
  • It is NOT used for assessment. Our challenges and badges are a fun way to encourage students to create and discover in the lab. The badges give students something to "take" with them after their time in the lab. It can be tough for a kid to work hard on an awesome marble run then have to dismantle it when it's time to clean up!
  • Our Makerspace is NOT gamified. When the kids are just making and creating there are no directions or badges to earn (other than an "I am A Maker" badge) just tools, resources, and their own imagination.

More Resources


Gamification is definitely on the rise and badges are just one way to bring it into your classroom. There are tons of resources out there to help you get started with gamification. Here are a few I've found. Please share more in the comments!
Also check out this crowdsourced padlet FULL of Gamification resources!

The Sun Terrace STEM Lab/Makerspace opened up in October, 2015 and it is an engaging, fun, hands-on learning space. The lab was originally Wendy Townlin's idea and with the support of our incredible principal Kris Martin-Meyer, four of us, Wendy, Amanda YoungClaire Simón and I put our heads together, researched, reflected then began building. Follow us @SunTerrace1 to see our STEM Lab and Makerspace projects!